To get started, take the following steps:
Step 1:
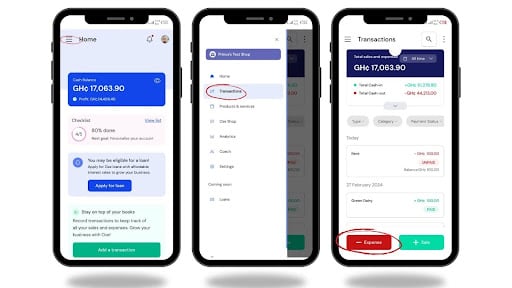
- After entering your login details, you are granted access to your Oze account.
- Click on the menu sign (☰) at the top left corner and when the drop-down menu appears, select Transactions.
- On your Transactions screen, select -Expense.
Step 2:
After selecting the -Expense, tab on Add Manually as your entry type to add an expense transaction.
- Select an expense type that suits your transaction from the various options listed in the app.
- For additional options that have not been listed, select OTHERS and proceed
- After selecting the expense type, proceed to inputting the amount (cost) of the expense.
- You may chose to provide a description related to the expense. This is optional.
- Click NEXT to continue.
.jpg?width=512&height=288&name=unnamed%20(1).jpg)
Step 3
- At the screen, you can choose the payment status and method of the expense transaction.
- If the expense is fully paid for, select PAID and choose the appropriate payment method used.
- If the expense is partially paid, select PARTIALLY PAID, and provide more information on the following:
- Amount paid so far
- Payment method
- And the date the final payment will be due to pay.
- If the expense is UNPAID, select UNPAID and provide the date payment will be made.
- Save the expense transaction.
.jpg?width=512&height=288&name=unnamed%20(2).jpg)
Congratulations! You created your first expense.